2007 / august / 26
Digital black and white photographs using Photoshop 7
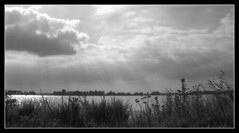
After posting this photo on Flickr, one of my contacts there - a very talented, professional photographer whose photos I have faved many times - asked me privately what my workflow is for making b/w photos. That was very flattering, thank you! So I set out and mailed him. Since it may be helpful to others, too, I’ve turned it into a more general description here.
Now, I am not at all a photoshop wizard, there are probably better and handier ways to do this... the comments are open!
I'm not using the latest and greatest, but mostly Photoshop 7, and it is quite hard to find tutorials online for this setup; most photoshop tutorials assume CS2, which added specialist tools for this.
But there's no need to shell out the money for the upgrade. If you work with RAW images, that money might be better spent on buying Aperture or Lightroom anyway. These are the real next-generation tools (organising and developing) that really have excellent possibilities for developing raw into monochromes.
Anyway, I work with a consumer point and shoot that only creates jpegs and Aperture and Lightroom won't even run on my G4 iBook, so I'm sticking with Photoshop 7 for now.
It's not difficult to make good-looking b/w's from digital colour originals using Photoshop 7. Even though the program is almost as old as film and doesn't have the specific tools.
Simply adjusting hue (or converting to image to greyscale) doesn't work - the image falls flat, with too little contrast, and muddy greys. What to do? There are many ways around it, but my favourite trick is to split the image into several layers, based on lightness.
Use the 'color select' tool to select the lightest part of the image, and/or the darkest.
Feather the selection. A few pixels - 3 to 5 - should do the trick. We're going for subtle here, we want some edges to remain, just not tiny little islands.
If color select doesn't work, try to extend it with the magic wand.
Now, make a new layer using copy.
If necessary, repeat this process another part.
We now have the original still in the background layer, and one or two layers above that with the darkest and/or the lightest section.
Now, adjust the level per layer, and then turn the hue down.
Finally, for really bleached out sections, I create a layer with mask over the section with either solid colour or a subtle gradient, then play with opacity to get it 'just right'. This will be just a few percent 'off-white' - it has to be very subtle.
When I do this, I tend to leave some part in the image completely white. This is the part the eye will be drawn to.
It may sound like a lot of work - but like with many photoshop tricks, once you've mastered it, it is a matter of minutes. Making the selections for the layers is the hardest.
Hope this helps!
the photographer | main | Just a few days to go
Posted on 14:31, 26 august 2007.
Categories:
